If you are a content creator, you know that ad revenue can be unpredictable. One month you are riding high on viral views, and the next, the algorithm changes, leaving your income in a slump. That is why diversifying your revenue stream is one of the smartest moves you can make.
Whether you are looking to fund a new camera, cover production costs, or just buy a coffee to keep the late-night editing sessions going, direct support from your audience is powerful. The good news? You don’t need millions of subscribers to start accepting donations.
However, how you ask for donations depends entirely on whether you are part of the YouTube Partner Program (YPP).
In this guide, we will break down the 7 best ways to add donation links to your videos, covering methods for both partners and non-partners.

Step 0: Choose Your Crowdfunding Platform
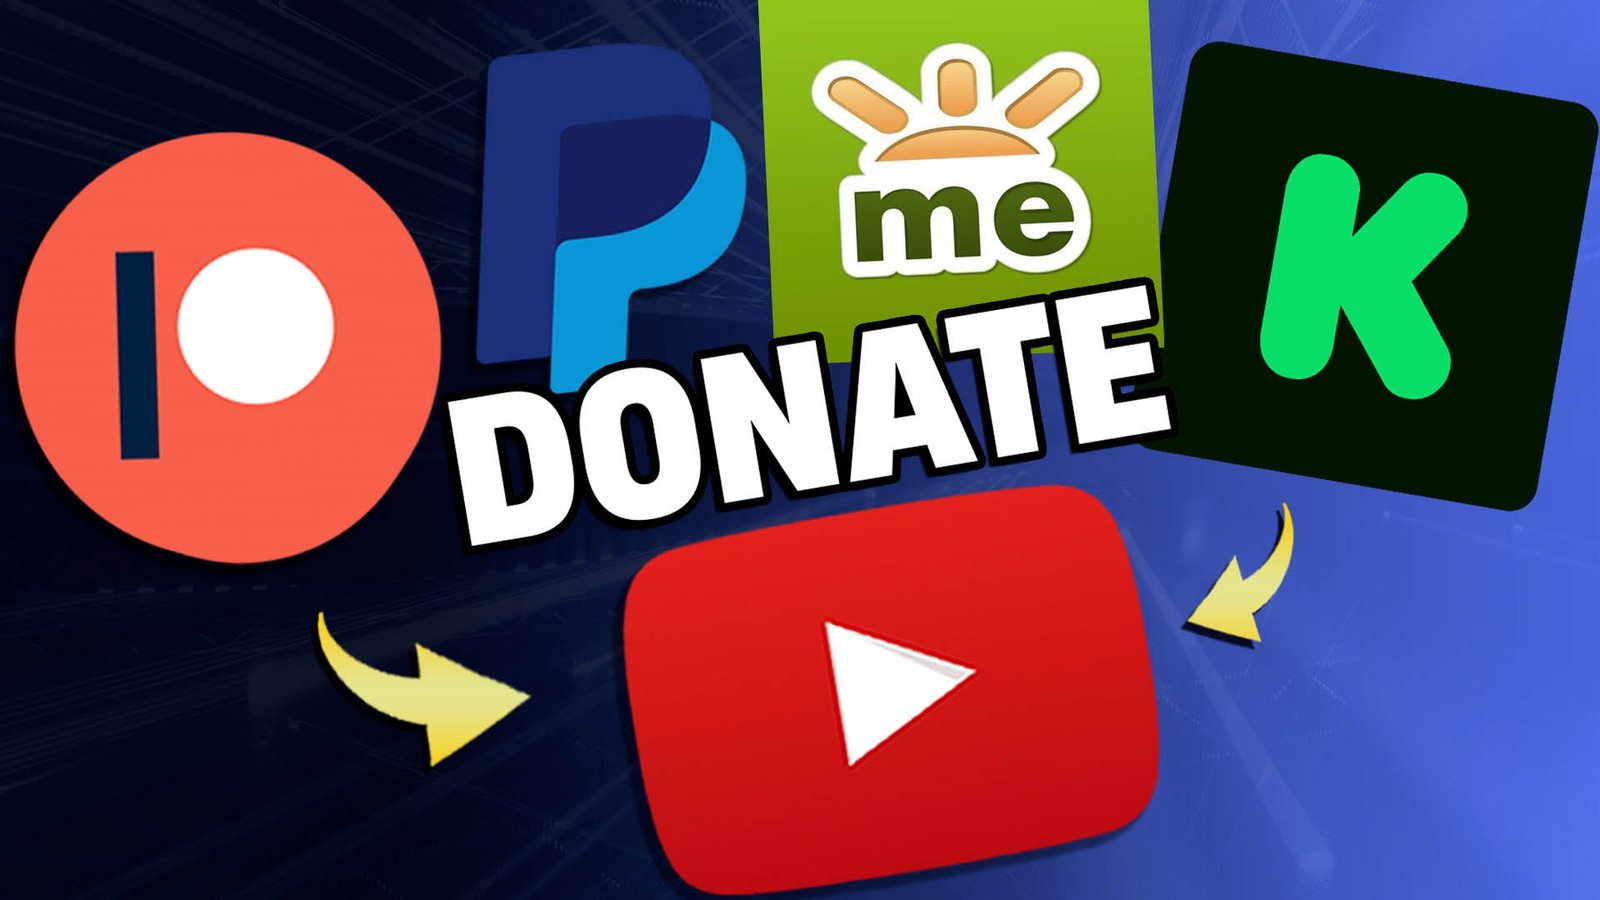
Before you start pasting links everywhere, you need a place for the money to go. If you are not a YouTube Partner yet, you will likely need a third-party platform. Even if you are a partner, these platforms often take lower fees than YouTube’s built-in tools.
Here are the heavy hitters you should consider:
- Patreon: Best for creators who want to offer exclusive content, behind-the-scenes access, or community perks in exchange for monthly subscriptions.
- Ko-fi / Buy Me a Coffee: Excellent for “no-pressure” one-time donations. They act like a digital tip jar and are very popular with streamers and artists.
- GoFundMe / Kickstarter: Ideal for specific, large-scale goals, like funding a documentary or launching a physical product.
Pro Tip: If you plan on using YouTube’s built-in “Cards” or “End Screens” to link out (Methods 4 and 5), you must use one of YouTube’s Approved Crowdfunding Sites. If you use an unapproved site (like a personal PayPal.me link), YouTube will not let you link to it directly from the video player.
Now, here are the 7 ways to ADD DONATIONS TO YOUR YOUTUBE VIDEOS.
7 Ways to Add Donations to Your YouTube Videos
Here are the most effective methods to turn viewers into supporters, ranked from easiest (for everyone) to advanced (for partners).
1. The Verbal “Call to Action” (CTA)
The simplest way to get a donation is to ask for it. It sounds obvious, but many creators forget to verbalize how viewers can support them.
You don’t need to beg. In fact, confidence works better. Instead of a sad plea, frame it as an opportunity for the viewer to get more value or help the channel grow.
- The “Value” Script: “If you learned something new in this video, consider buying me a coffee using the link in the description. It helps me keep these tutorials free for everyone.”
- The “Goal” Script: “I’m currently saving up for a new microphone to improve the audio quality for you guys. If you’d like to chip in, there’s a Ko-fi link below!”
Why this works: Viewers often watch on autoplay/passive modes. A verbal cue snaps them back to attention and directs their eyes to your description.

2. The Video Description Box
This is the bread and butter of YouTube donations. Every single video you upload should have a donation link in the description. It is accessible to every creator, regardless of subscriber count.
However, don’t just bury the link at the very bottom.
- Above the Fold: Place your donation link in the first 2-3 lines of your description. On mobile devices, this is the only text visible before a user has to click “…more”.
- Use Clear Anchor Text: Instead of just pasting a messy URL, write “Support the channel here:” followed by the link.
If you are just starting your channel, building this habit early ensures that your most loyal early adopters know exactly how to support you from day one.
3. The Pinned Comment
The comment section is often the most engaging part of a video. Many viewers scroll down to read comments while the video is still playing. This makes the Pinned Comment prime real estate for a donation link.
How to do it:
- Post a comment on your own video immediately after publishing.
- Write something engaging, like: “Thanks for watching! If you want to support future videos, check out my Patreon here: [Link]”
- Click the three dots next to your comment and select “Pin”.
Why this works: It stays at the very top of the comment section forever. Unlike the description, which can be hidden behind a “show more” button, the pinned comment is almost impossible to miss for anyone interacting with your community.
4. YouTube Info Cards (Partners Only)
Now we are entering “YouTube Partner” territory. If you have been accepted into the YPP, you can use Info Cards. These are the little notifications that slide out from the top right corner of the video player (usually accompanied by a small “i” icon).
How to set it up:
- Go to your YouTube Studio dashboard.
- Select “Content” and click the pencil icon on the video you want to edit.
- On the right-hand sidebar, click “Cards”.
- Select “Link” from the options.
- Note: If you are not a partner, this option will be grayed out.
- Paste the URL of your crowdfunding page.
- Crucial: It must be on the Approved Crowdfunding Sites list.
- Add a custom “Teaser text” (e.g., “Support the Channel!”) and a “Call to action.”
This method is powerful because it is interactive. It allows the viewer to click and donate without ever leaving the video player interface to hunt for a link.

5. End Screens (Partners Only)
The last 20 seconds of your video are crucial. Usually, you use this space to link to other videos, but you can also use it to drive donations.
How to set it up:
- In YouTube Studio, go to the video editor.
- Click “End Screen” on the right sidebar.
- Click “Element” and choose “Link”.
- Enter your approved crowdfunding URL.
- YouTube will ask you to select an image for the button (usually your crowdfunding profile picture or a custom “Donate” graphic).
Strategy Tip: Don’t clutter your end screen. If your main goal for a specific video is to raise money, make the donation button prominent. If your goal is watch time, maybe prioritize a video link instead.
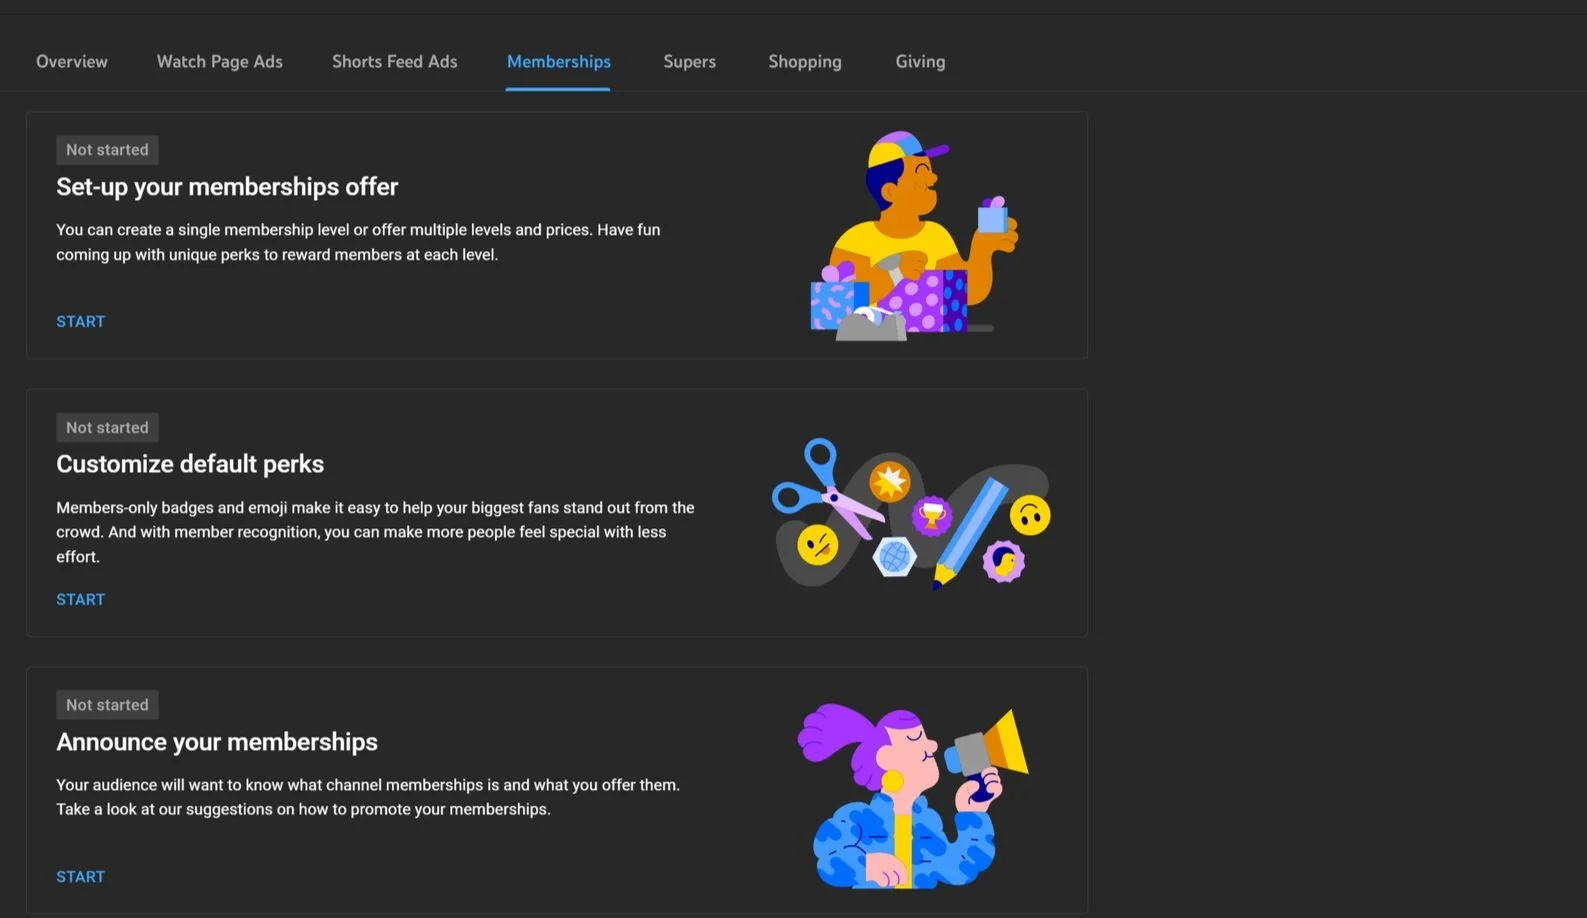
6. Channel Memberships (Built-in Crowdfunding)
If you don’t want to use a third-party site like Patreon, you can keep everything inside YouTube using Channel Memberships. This adds a “Join” button next to your “Subscribe” button.
Requirements:
- You must be in the YouTube Partner Program.
- You must have at least 500 subscribers (note: requirements may vary by region, but 500 is the current standard for fan funding features).
How it works: You create different “tiers” of membership (e.g., $2.99/month, $4.99/month). In exchange, members get:
- Custom loyalty badges next to their name in comments.
- Exclusive custom emojis.
- Access to “Members Only” community posts and videos.
This is excellent for retaining revenue within the Google ecosystem, though keep in mind YouTube takes a 30% cut of membership revenue, which is higher than most third-party platforms.
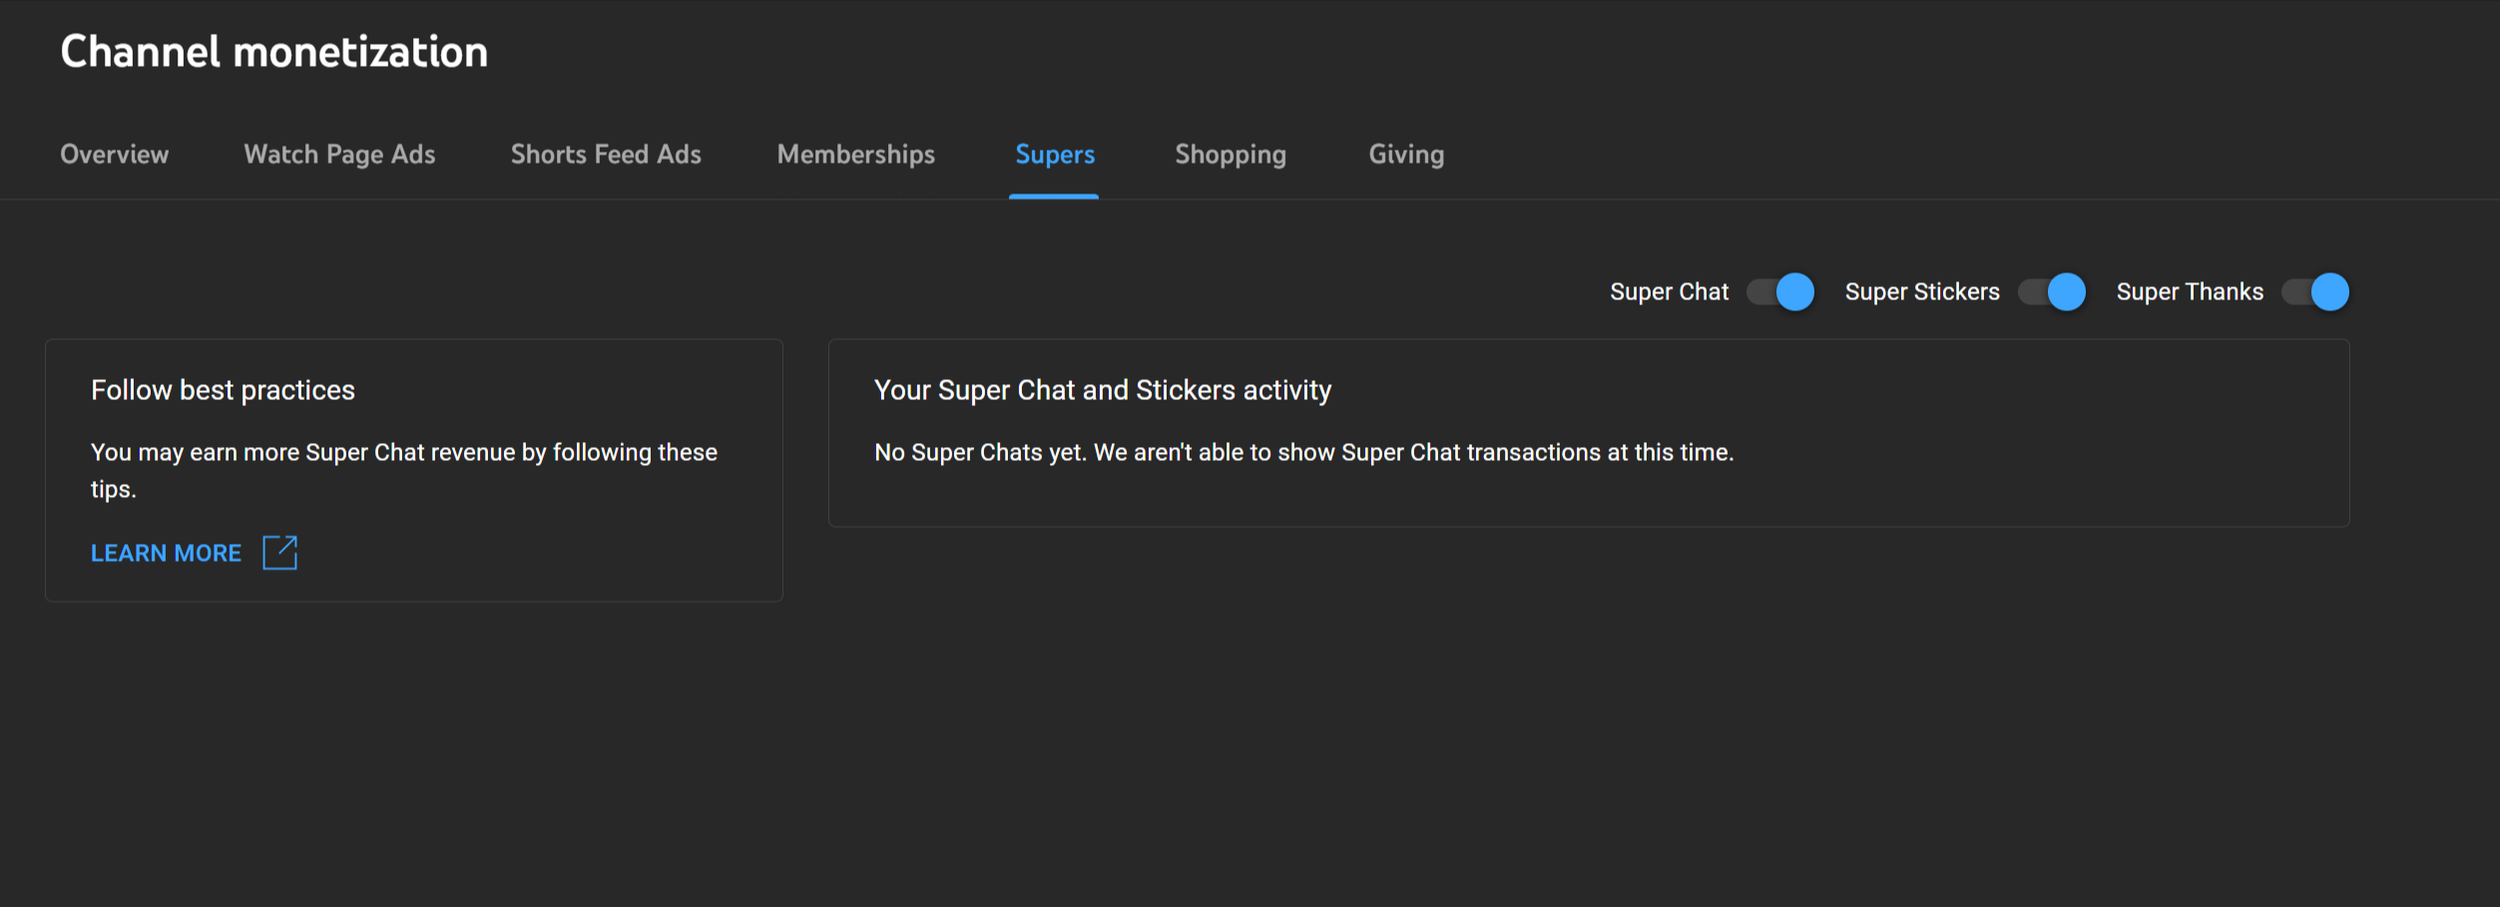
7. YouTube Supers (One-Time Donations)
While Memberships are for recurring monthly income, “Supers” are for one-time tips. Once you enable these in your “Monetization” (or “Earn”) tab in YouTube Studio, they appear automatically.
There are three types of Supers:
- Super Chat: Used during Livestreams. Viewers pay to pin their comment to the top of the live chat for a set amount of time. The more they pay, the longer it stays.
- Super Stickers: Also for Livestreams. These are large, animated stickers that pop up in the chat to grab attention.
- Super Thanks: This is for regular, uploaded videos. It appears as a “Thanks” button (shaped like a heart with a dollar sign) under your video. Viewers can tip you $2, $5, $10, or $50 to have their comment highlighted colorfully in the comment section.
If you are looking to increase your income without committing to creating extra content for patrons, enabling Supers is a “set it and forget it” strategy.
Conclusion
Adding donation links to your YouTube videos is one of the fastest ways to start monetizing, often long before you qualify for ad revenue. Whether you use a simple pinned comment with a Ko-fi link or a sophisticated End Screen strategy with Patreon, the key is consistency.
Don’t be afraid to ask. Your true fans want to support you; you just have to give them the opportunity.
Ready to grow your channel even faster? Subscribe to the YT Torials newsletter for weekly tips on SEO, monetization, and video editing strategies delivered straight to your inbox!
Popular Posts
Follow YT Torials:

No responses yet