If you are looking for a simple, “set it and forget it” way to get more subscribers on YouTube, the video watermark is your best friend.
When you are focused on creating great content, it is easy to forget the small settings in the YouTube dashboard. However, this small graphic that sits in the bottom right-hand corner of your video player is a powerful tool. It adds instant brand association, but more importantly, it functions as a clickable subscribe button for viewers on desktop computers.
In this guide, we will walk you through exactly how to upload, customize, and optimize your YouTube watermark.
What is a YouTube Video Watermark?
A video watermark is a small image (usually your logo) that overlays your video content. It appears on every single video on your channel automatically once you set it up. You do not need to edit it into your videos using software like Premiere Pro or Final Cut. YouTube handles the heavy lifting for you.
Why should you use one?
Protection: It makes it slightly harder for others to steal your content without credit, as your logo is embedded in the player.
Brand Consistency: It reminds the viewer who they are watching.
One-Click Subscription: When a viewer on a computer hovers their mouse over the watermark, a “Subscribe” button pops up. This reduces friction and helps grow your channel faster.
Step-by-Step: How to Add Your Watermark
Ready to update your channel? Follow this simple walkthrough to get your branding set up in minutes.
1.Go to YouTube Studio
First, log into your YouTube account. Look for your profile picture icon in the top right corner of the screen. Click the icon to open the drop-down list and select YouTube Studio. This is your command center for all channel settings.
2. Navigate to Customization
Once your YouTube Studio dashboard has loaded, look at the menu on the far left of your screen. You will see options like Dashboard, Content, and Analytics. Scroll down until you find Customization (it looks like a magic wand icon) and click it.
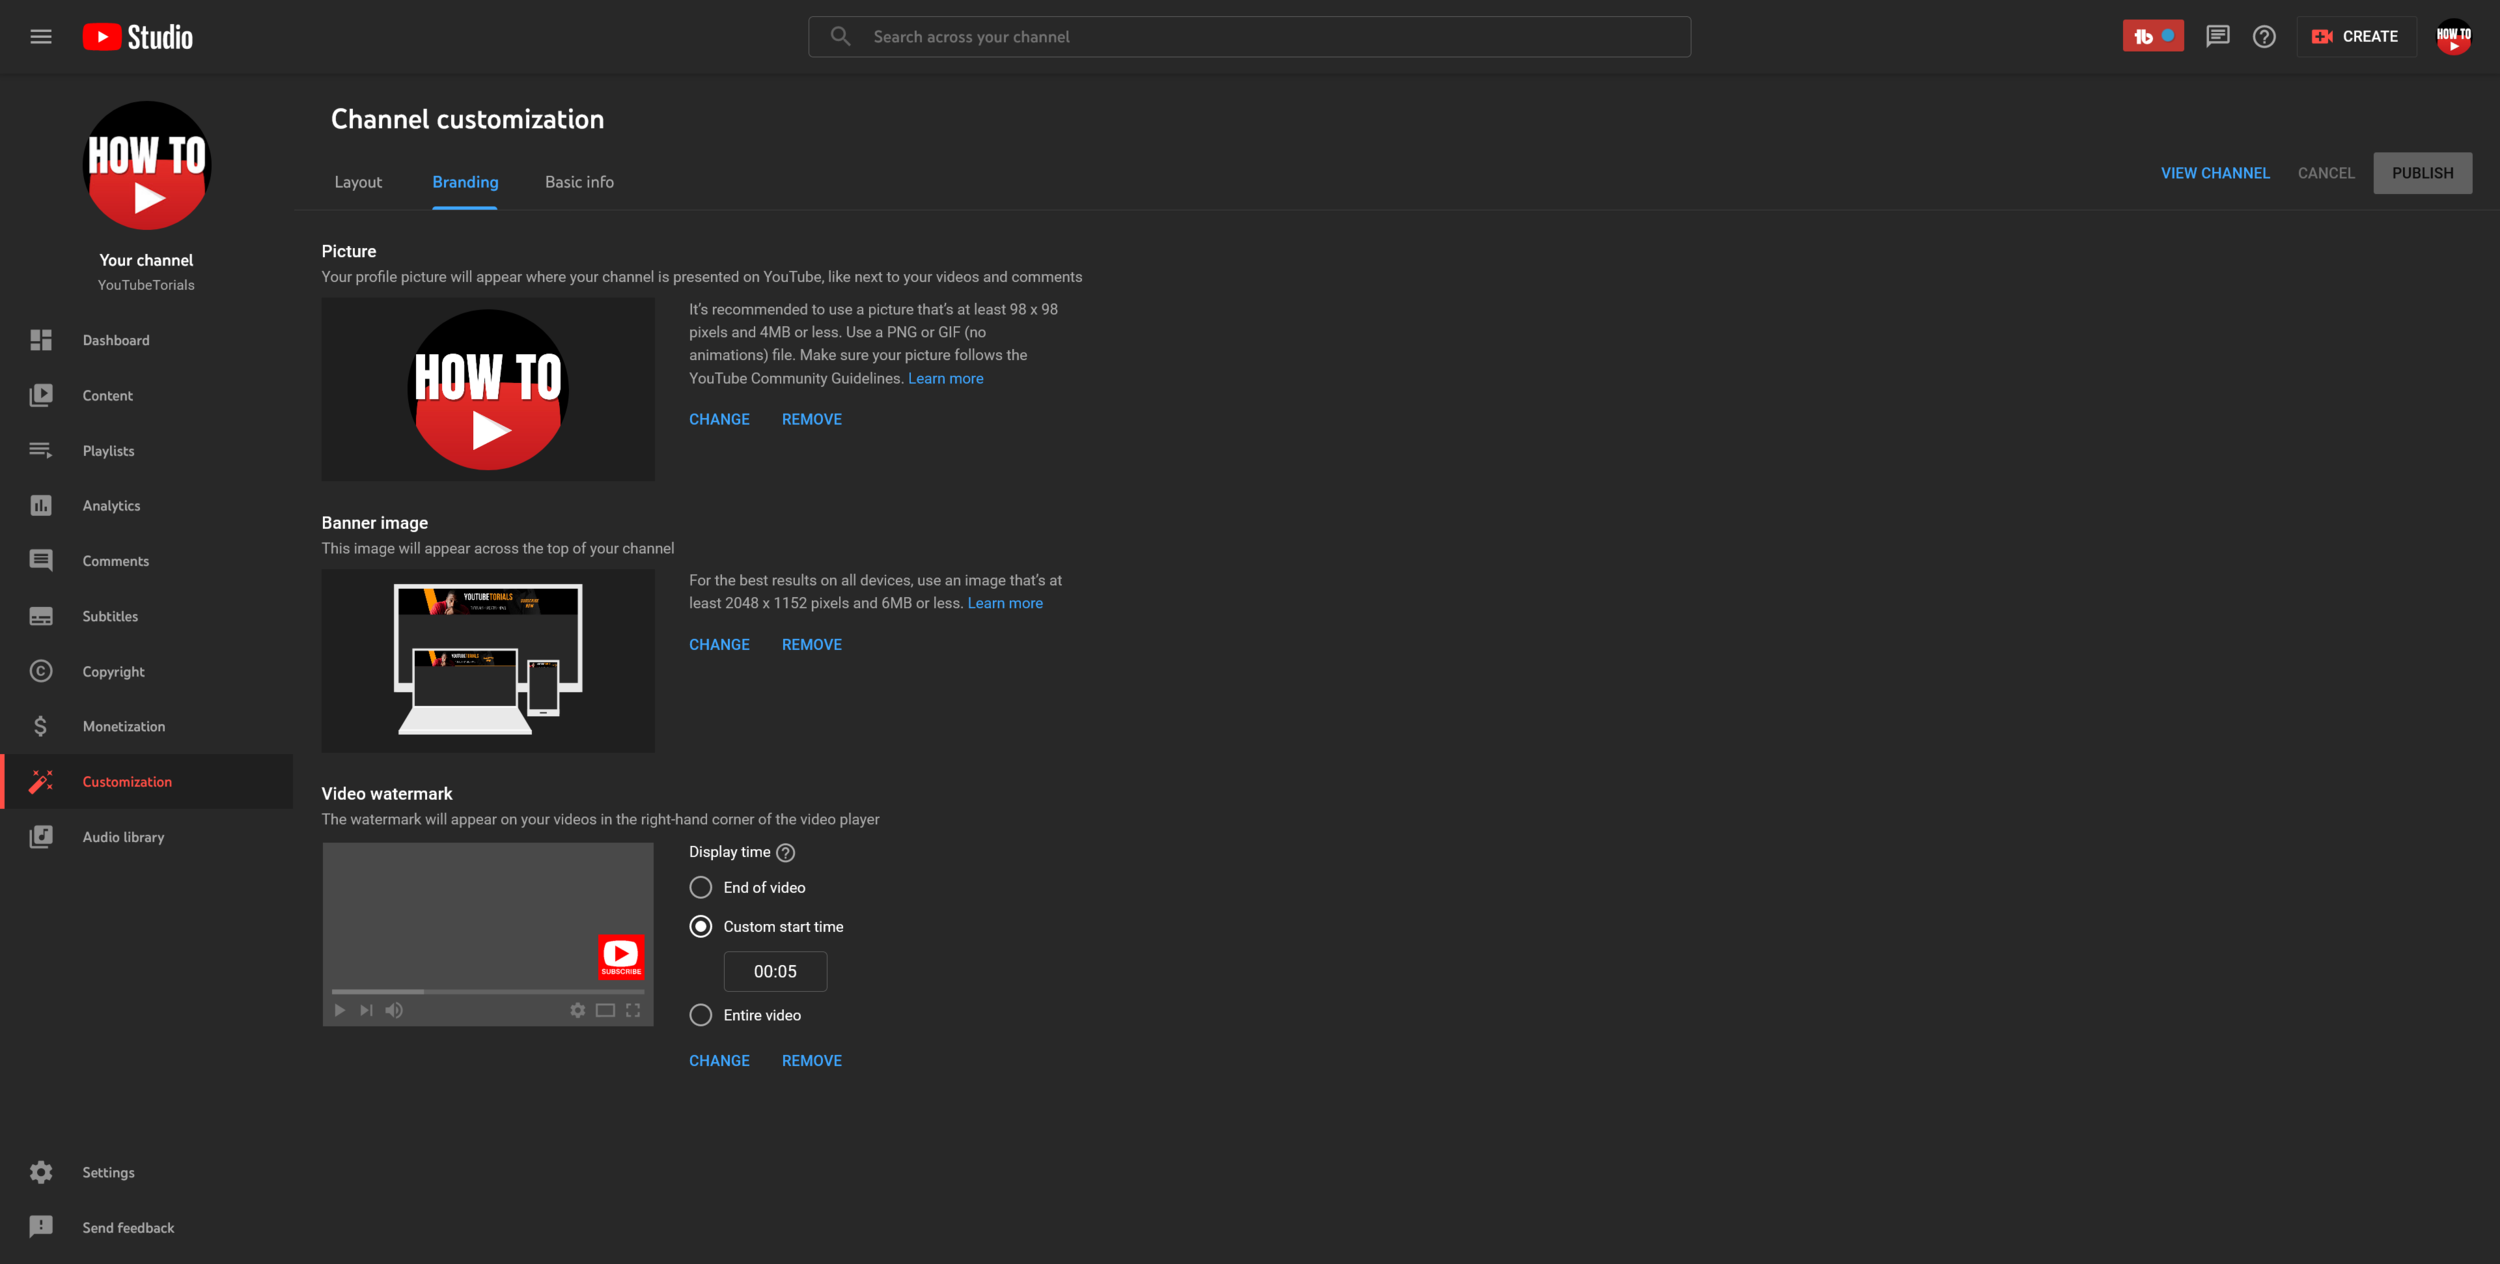
3. Access the Branding Tab
At the top of the Customization page, you will see three tabs: Layout, Branding, and Basic Info. Click on the middle tab labeled Branding.
This page is where you manage your profile picture and banner image. If you need help with those other elements, check out our channel art guide to ensure your channel looks professional.

4. Upload Your Image
Scroll to the bottom of the Branding settings until you see the “Video watermark” section.
- If you have never added one, click Upload.
- If you already have one and want to update it (as shown in the tutorial steps), click Change.
- If you want to delete the current one, click Remove.
Search your computer for your logo or image file.

5. Crop and Save
Once your image uploads, a box will appear allowing you to crop the image. Use the cropping tool to remove any empty space and centralize the image. Because the watermark is small (displayed at 150×150 pixels), you want the logo to fill as much of the square as possible so it is easy to see.
Click Done when you are happy with the preview.
Choosing the Right Display Time
After uploading the image, YouTube gives you three options for when the watermark appears. This is a strategic choice that can impact your viewer retention and subscription rates.
- End of video: The watermark will only show up in the last 15 seconds of your video.
- Pros: It doesn’t distract from the content.
- Cons: Many people stop watching before the very end, so they may never see it.
- Custom start time: You choose exactly when the watermark fades in.
- Pros: You can avoid having it cover up your intro graphics.
- Cons: Requires you to know your average intro length.
- Entire video: The watermark is visible from 0:00 to the end.
- Pros: Maximum exposure. Viewers can subscribe at any moment.
- Cons: Can slightly obstruct visuals in the corner (though it is usually transparent).
Recommendation: For most creators, selecting Entire video is the best move. You want to give viewers the opportunity to subscribe the moment they decide they like your content, not just at the end.
Finally, click Publish in the top right corner to save your changes. Your watermark will now appear on all past and future videos.

The “Subscribe Button” Strategy
Here is a pro tip that many top YouTubers use: Don’t use your logo.
While using your logo is good for branding, it doesn’t always tell the user what to do. A viewer might see a small logo and ignore it. However, if you upload a small image that looks like a red “Subscribe” button, you are giving them a direct Call to Action (CTA).
Psychologically, when a user sees a button, they are more likely to click it. If you are struggling to increase your video views into subscribers, try swapping your logo for a generic “Subscribe” button graphic for a month and see if your numbers go up.
Technical Requirements and Best Practices
To make sure your watermark looks crisp and professional, stick to these specifications provided by YouTube:
- File Format: PNG, GIF (no animations), BMP, or JPEG.
- File Size: Less than 1 MB.
- Resolution: Minimum of 150 x 150 pixels. Square images work best.
- Transparency: Always use a PNG with a transparent background. If you use a JPEG, you will have a white box around your logo, which looks amateurish and blocks more of the video.
For more detailed technical specifications on image assets, you can read the official guidelines on Google Support.
Conclusion
Adding a watermark is a small task that yields long-term results. It makes your channel look established and turns every video you publish into a subscription magnet. whether you choose your own logo or a “Subscribe” button strategy, just make sure you hit that publish button today.
If you found this guide helpful and want to stay ahead of the latest YouTube features and growth hacks, make sure to subscribe to the YT Torials newsletter. Also, consider checking out the YT Torials YouTube channel.
You can find more videos on getting more views, subscribers and YouTube updates.
Follow YT Torials:

No responses yet